PGD Tracker Kit Instructions
Congratulations and thank you for purchasing the PGD Tracker Kit. All of the components in your kit are precision devices and have been carefully inspected prior to shipping. To insure that using your PGD Tracker provides the benefits to your action photography it was designed for, please read through the following instructions completely.
Your kit includes the following:
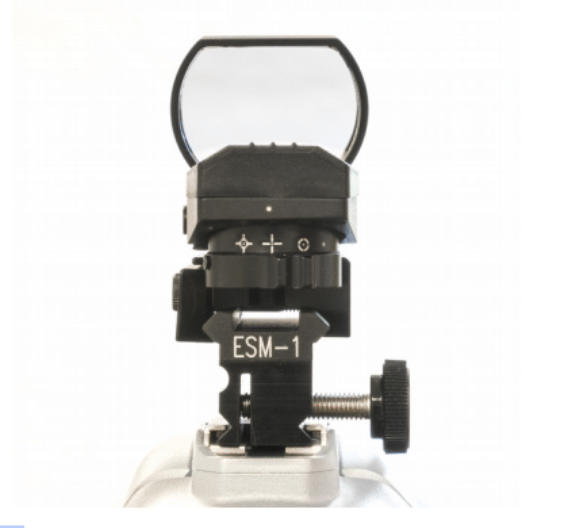
The PGD Tracker pre-mounted to the PGD External Sight Mount (ESM)
One replacement CR2032 battery. (A battery is pre-installed in the Tracker)
Two hex wrenches, large (3mm) and small (1.5mm)
Cleaning cloth
Kit storage pouch
Starting in 2020 we are now including a “Quick Setup” method for those who are in a hurry to use the PGD Tracker, which starts just below. You are encouraged to read through this entire document, however, so you have a full understanding of how the Tracker works and alternative setups. The original instructions will start with “Step 1: Turn on the Tracker”.
You will need your camera and telephoto lens, the Tracker, the included 3mm allen key, and a tripod.
Find a place where you have a line of sight to a distant small object like a sign, or any object that stands out that is approximately 6-12 inches in size. It could be a ‘no parking’ sign, part of a tree, a bird house, a mailbox, etc.. It should be a great distance away, (hundreds to thousands of feet depending on your lens), so that your cameras center focus point nearly covers the object.
Remove the rubber lens cover and slide the PGD Tracker into the flash socket of your camera until it stops. Firmly tighten the clamp screw knob. The Tracker should be securely in place with no perceived looseness.
Turn the PGD Tracker on by rotating the top dial to the green or red #5, (1 is least bright, 5 is the brightest).
Set the Tracker reticle to the “dot” style using the toggle switch moved fully left.
With the tripod set to a height that will allow you to easily see through the tracker, focus and center on the target object with your lens zoomed to maximum focal length. Lock the ball head.
With the camera center focal point on the object raise your eye to look over the top of the Tracker and through the center of the Tracker lens to locate the reticle and see where it is relative to your target object. Turn the up/down and right/left adjusters with the supplied 3mm ‘L’ wrench so that the reticle dot is the on the same spot as your camera center focal point. Use one hand to gently hold the Tracker while you are making adjustments. Tracker set up is complete!
Set your camera focus system to continuous mode and a multiple focus point array. 9-25 points usually works best, but consult your camera manual as every camera has similar but different settings for action photography.
Don’t forget to turn the PGD Tracker off when you are not using it or to store it in your gear bag. Turn the dial to the letter G or R.
Practice on stationary and slow moving targets, close and far, to get used to shooting with the PGD Tracker. Keep both eyes open! You can see more and it is easier to follow moving targets.
This completes the Quick Setup. Please continue reading the original more detailed instructions that follow. The descriptions of the parallel and fixed point setups are alternatives that may be useful to you. The quick set up above is a blend of these two approaches and is the method we personally use to set up our Trackers.
Step 1:
Turn on the Tracker
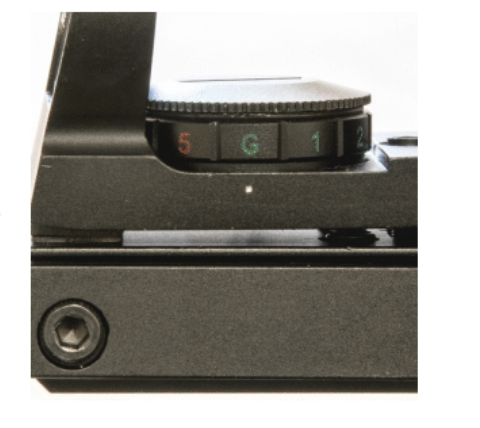
Turn the dial to either the Green 5or Red 5. 5 is the brightestsetting for the reticle. You may choose any brightness or colorbased on personal preferences later.
At the back of the sight, just above the ESM-1 rail, is a toggleswitch showing four reticle options. Again, the choice is a matter ofpersonal preference, but for the calibration process described laterin these instructions, we suggest using either the “cross hair: +”reticle, (the second choice from the left), or the “single dot” (on thefar right).
Hold the Tracker out in front of you, approximately 4” from yournose, and look over the back of the sight and through the lens. Youshould not be able to see the battery cover. Gently move the sightup or down with slight changes to the attitude of the sight until you cansee the reticle on the lens. Try the other reticle styles and theintensities 1-5 in both colors. We suggest doing this in a softly litlocation. The lower brightness values may be hard to see in brightlight. Contact us if any of the reticle styles or colors are not functioning.
Always turn the Tracker off when you are not using it. Rotate theIntensity dial to align with the Ror Gover the small white dot on theside of the tracker. These are the “off” positions. The battery canprovide 60-80 hours of service.
Step 2: Mount the Tracker on your camera hot shoe
Remove the rubber lens cover. Back the ESM clamp screw out a few turns before sliding the ESM – Tracker assembly into your camera hot shoe. It should not require more than very modest force, at most, for the ESM to slide fully forward into the hot shoe. It may slide easily. There are variations in hot shoe geometries across brands and models. While gently holding the ESM forward against the front of the hot shoe, turn the clamp screw until it is firmly seated. Use no tools! The clamp screw is tight enough when any perceived looseness of the Tracker in the hot shoe disappears, and the Tracker cannot slide out of the hot shoe due to its own weight if pointed upward.
Step 3: Calibrate the PGD Tracker to your camera
The PGD Tracker must be calibrated to your camera before use. Calibration is best done with your preferred telephoto lens and a sturdy tripod. This method describes a simplified “parallel offset” calibration and is based on the fact that on the typical DSLR, the Tracker is positioned above the lens center line by a little less than 5”, the same height as a 12 oz soda can. If you have a smaller or a mirrorless camera, the offset is less, and you need an object matching your offset or just use a ruler.
Turn your Tracker on and confirm that it is functioning.
Place a 12 oz can of soda about 50-100 feet away and at the approximate height of your supported camera. The distance is not critical, but you want to be able to see the can easily in your view finder. Either set your Auto Focus to “single point, center” or enable any view grid your camera may offer that indicates the center of your view frame. This can be done in “live view” if your camera has that feature. Use the 3X3 + Diagonal display if your camera offers it. You need to see the true center of the frame. Consult your camera manual.
Focus on the soda can and place the view finder center point on the bottom of the can, centered.
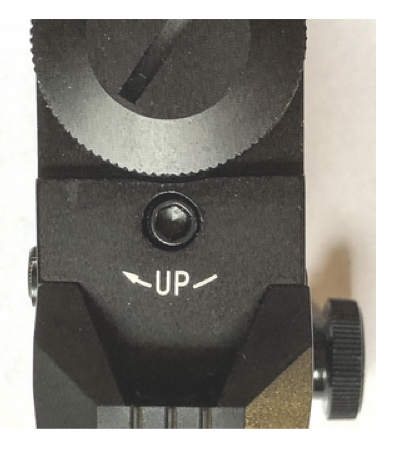
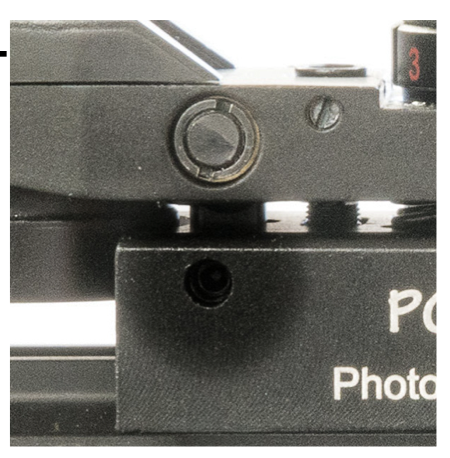
Use the small hex wrench to turn the vertical calibration lock screw, (see below), until it is just snug, then back off 1/16 of a turn. Now, using the large hex wrench in the screw labeled “Up”, adjust the reticle, up or down as required, until the reticle is on the top of the soda can.
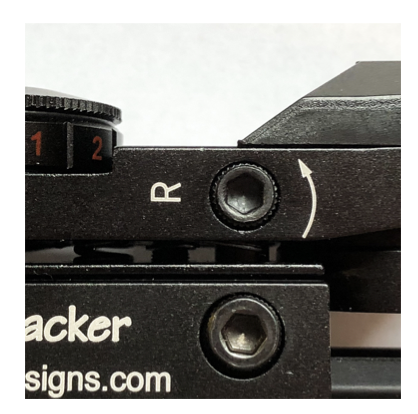
Using the side adjust screw, labeled “R”, move the reticle until it is centered on the can directly above the center in live view.
Snug the vertical calibration lock screw when you are satisfied. Recheck the right - left adjustment. (Tightening the locking screw may nudge the reticle a small amount).
You are done!
(Remember to relax the Vertical calibration lock screw if you wish to change the vertical calibration)!
Non DSLR Cameras and
“Parallel vs Distance” calibration
The Tracker mounted on your hot shoe is nominally 4 to 5” above the centerline of the camera lens, depending on your camera. Measure your own for reference. The nearest 1/8–1/4” is accurate enough. On the Canon 7D shown, the measurement is 4 7/8”.
Parallel Method: With parallel calibration, you must estimate the offset of the reticle relative to your subject both close and far. This becomes easy with a little practice. The reticle is adjusted so that it is always 4-5.5” above the center of your lens centerline, (measure and use your camera offset dimension). Your optical line of sight and the lens centerline are then parallel when the reticle is the same height above the target close and far, say 25' and 100'. Propping a ruler or tape measure and using that as a target will aid the adjustment process. Remember, the offset is less of an issue for targets that are quite far off but very important for close targets that might fill the frame.

Distance Method: The reticle is adjusted to be exactly on your target at a distance you choose. Center the frame at a specific distance, perhaps the distance that your subjects might most often be (e.g., 50' for small birds using a 400-600mm telephoto). With the distance calibration the reticle will appear below the true center of your frame at greater distance and above true center for a shorter distance. For long subject distances, (hundreds of feet), the offset compensation can be considerable.

Both methods will require some practice in the field to achieve consistent results. Use the approach that best fits your shooting mission. Try it both ways. Re-calibration is easy.
Changing the Tracker battery
Removing the battery cover is easier with the rubber lens cover off, but try to avoid touching the glass. Place the Tracker on the edge of a flat surface with the ESM hanging off the edge so the tracker sits flat. Remove the battery cover situated on the color – intensity dial behind the lens using a small coin. A nickel is perfect. Grip the dial with a thumb and finger with one hand and use the coin to loosen the cover, turning counter clockwise. It may feel snug as there is a sealing O Ring under the cover. After a quarter turn it will spin freely.
Place a fresh CR2032 battery into the battery cavity with the battery printing facing up. Center the battery cover over the battery. Place the tip of a forefinger on the cover center and press down against the springs. With your other hand use a thumb and forefinger to grip and rotate the edge of the cover until the threads engage. If the cover feels stuck and the dial itself turns, reverse the cover a quarter turn and retry. The procedure requires a little patience. Once the treads are engaged, continue to turn the cover, now using a coin, and gripping the dial until the cover is snug. Be gentle. The screw thread on the cover and body are very fine. Forcing the cap when the threads are not properly engaged will damage them.
WARNING!!!
Don't leave the PGD Tracker on your camera when you are not using it!
Rough handling of the ESM and Tracker or contact with other objects while mounted to your camera can affect the calibration or potentially damage your hot shoe, the Tracker, or both. The ESM is designed for easy mounting with repeatable positioning thus maintaining calibration to your camera, and it is structurally strong. PhotoGearDesigns accepts no responsibility for damage to PGD Tracker, the ESM, or the camera to which it is mounted.
If you suspect the ESM or Tracker may have been impacted due to a drop or other incident, carefully inspect the camera and Tracker. Recheck the calibration.
Tips
To reduce unnecessary stress on the camera hot shoe, remove the lens cover before mounting the Tracker. Remove the Tracker from the camera to put the lens cover back on.
Turn off your sight when you are not using it! The batteries typically provide 60-80 hours of use. But if left on when stored, the battery may be drained the next time you want to use it. Always keep spares in your Tracker pouch or gear bag. The CR2032 battery is readily available wherever batteries are sold. One spare is included in your kit.
Pick an AF pattern on your camera that best fits your subject matter. We suggest a 6×6 or 12×12, or similar, centered matrix. Be aware of your background. A featureless sky is more forgiving than trees and other objects which might confuse the AF if the pattern is too large.
The usual rules for action photography are... fast shutter speeds (1/1000–1/2500), an F-stop to provide DOF as desired, and auto ISO are typical configurations. Continuous AF is typically used. Consider enabling back button focus. Experiment and find the settings that give you the best results with your equipment.
Confirm sight calibration at the start of each shoot. In the field, simply pick any small object using single-point AF, (or your live view), and confirm that the reticle is vertically aligned and has the proper offset. If you don’t have a tripod with you, take a shot using the optical sight and confirm that the image is framed as you expected. Keep the hex L wrenches that come with your sight in your kit bag in case you need to tweak the calibration.
Seagulls make excellent subjects for practicing visual tracking while controlling the shutter and AF.
The ESM and PGD Tracker are not warranted for accidental damage, and we accept no responsibility for camera damage of any kind. If you do not agree to this, return the PGD Tracker Kit, unused, and we will gladly refund the purchase price. Return shipping is the buyer’s responsibility. Visit www.photogeardesigns.com for more warranty information.